
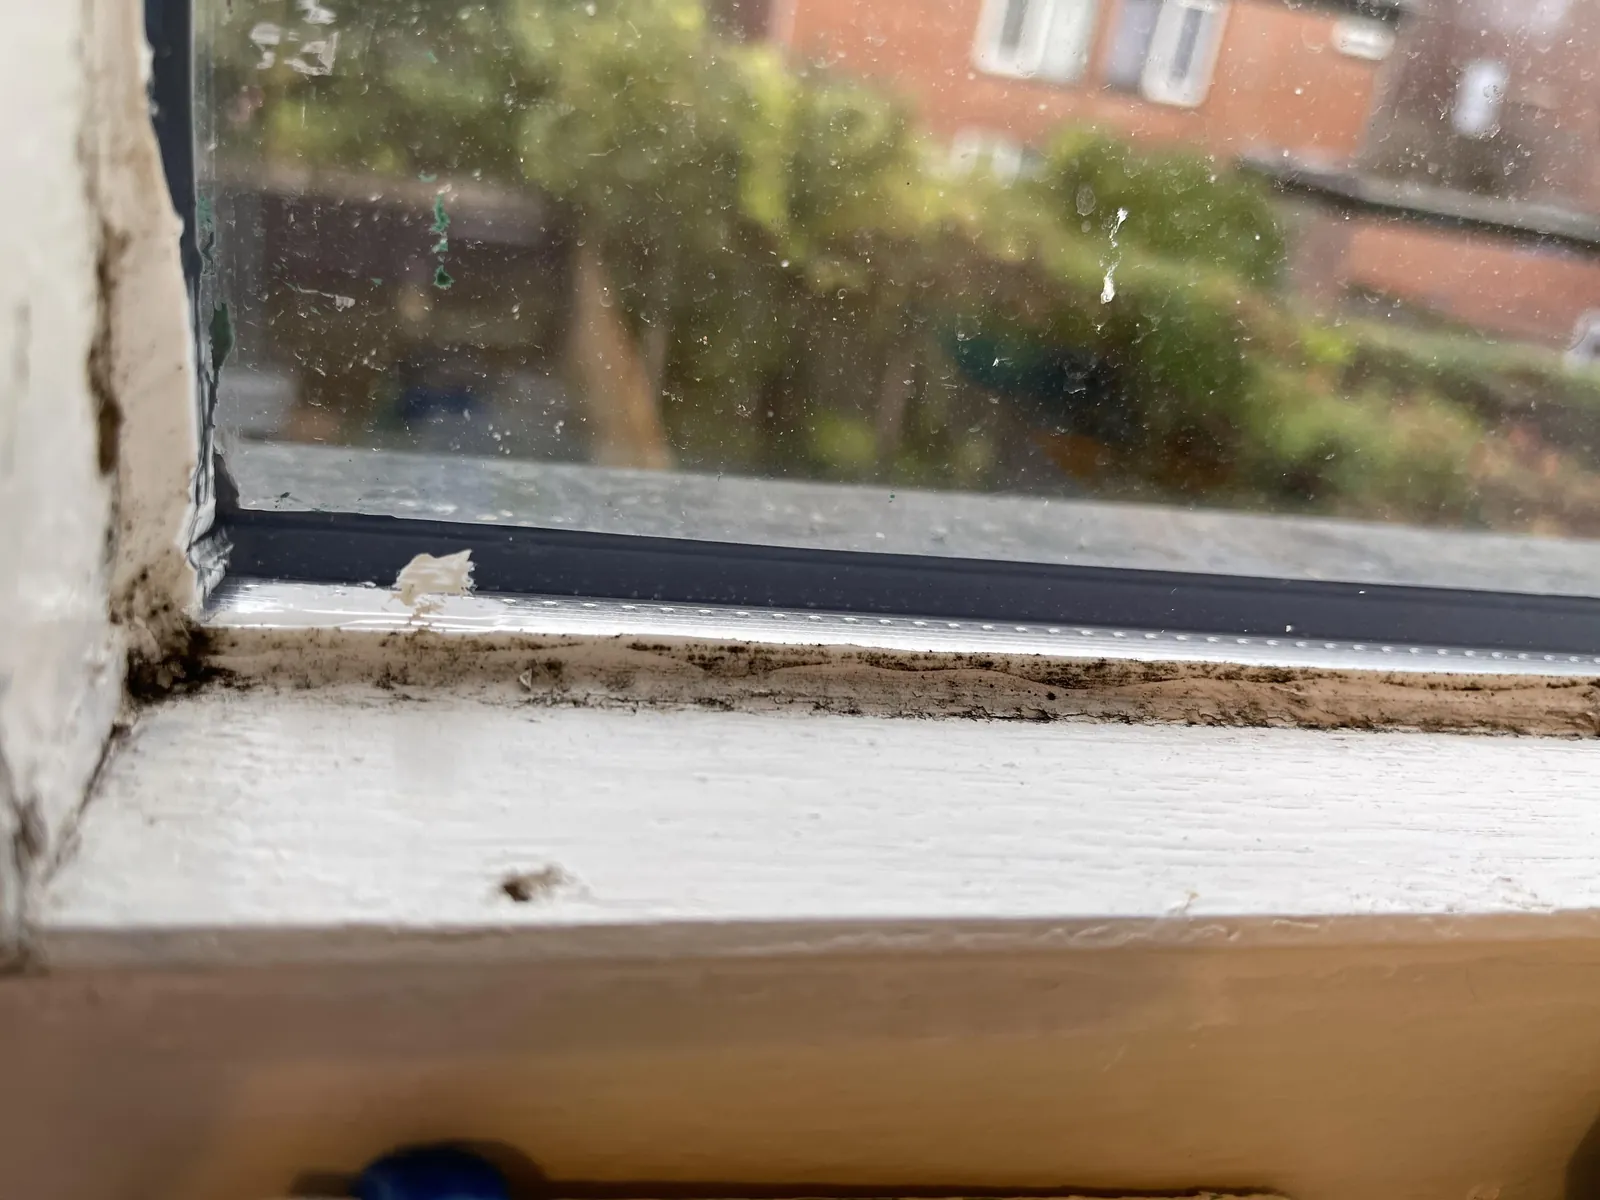
Mold in sealant edges often occurs in bathrooms, kitchens and around windows. Especially in damp areas, sealant can become black, gray or spotty. That doesn't look fresh and in the long term it can also indicate too much moisture or poor ventilation.
The short rule is: you can sometimes clean superficial mold, but you usually can't get rid of mold that has penetrated the sealant. Then the best solution is: remove old sealant and seal it again. In this article we explain how mold develops in sealant edges, when cleaning still makes sense and when it is better to replace the sealant.
How does mold develop in sealant edges?
Mold grows in places where moisture remains for a long time. Sealant edges are sensitive to this, especially in bathrooms and showers. Water, soap residue and dirt easily remain on or along the sealant.
Mold develops more quickly due to:
- poor ventilation
- high humidity
- water that remains standing
- soap residue
- dirt on the kit
- old or porous sealant
- poor cleaning
- leakage
- cold surfaces
- insufficient drying after use
In a shower corner, the sealant edge is often wet every day. If it does not dry properly, mold is more likely to grow.
How do you recognize mold in sealant?
You can usually recognize mold in sealant by black, gray or dark spots. In the beginning, these spots are often on the surface. Later they can move deeper into the sealant.
Signs of mold:
- black dots
- dark stripes
- gray haze
- stains that return after cleaning
- musty smell
- discolored sealant
- soft or loosening sealant
- moisture behind the sealant edge
Not every discoloration is mold. Sometimes it is dirt, soap residue or limescale. However, black dots in damp sealant edges are often mold. Are you unsure whether it is an attack? Also read how to recognize and tackle limescale on shower glass.
Is mold in sealant dangerous?
A little mold in the sealant is usually not an immediate cause for panic, but it is a signal that moisture and ventilation require attention. Mold has no place in a healthy bathroom or kitchen.
Mold can cause:
- stale air
- ugly sealant edges
- faster wear of sealant
- spread to other places
- moisture problems
- irritation in sensitive people
If there is a lot of mold or recurring mold, you not only need to clean, but also tackle the cause.
Can you remove mold from caulk?
That depends on how deep the mold is.
| Situation | Solution |
|---|---|
| Mold is on the surface | Cleaning can help |
| Mold is lightly present in the kit | Possible to temporarily reduce |
| Kit is discolored deep black | Usually replaced |
| Sealant is loose or soft | Replace |
| Mold returns quickly | Address the cause and replace the sealant |
If mold has really penetrated the sealant, you usually cannot get rid of it completely. The spots may lighten, but they often remain visible or come back.
How do you remove surface mold?
In case of mild mold, you can first try to clean the sealant. Follow this step-by-step plan:
- Clean the sealant edge with warm water.
- Remove soap residue and dirt.
- Apply a suitable mold cleaner.
- Allow to work briefly according to the packaging.
- Brush gently with a soft brush.
- Rinse thoroughly with clean water.
- Dry the sealant completely.
Don't use too hard or too aggressively. Sealant can be damaged if you sand too hard.
Rule of thumb: If you cannot remove the black spots after two thorough cleanings, the mold is too deep and replacement is the better choice.
Use mold cleaner
A mold cleaner can work well for superficial mold. Many mold cleaners contain bleach or other active ingredients that lighten mold stains. NB:
- ventilate well
- wear gloves if necessary
- follow the instructions
- never mix different cleaning products
- rinse thoroughly
- do not use aggressive substances unnecessarily often
- be careful with natural stone, black profiles and sensitive materials
Mold cleaner can bleach stains, but does not always solve the cause.
Vinegar against mold in sealant
Vinegar is often used as a household remedy against mold. It can help with light mold and dirt, but doesn't always work well with black mold that is deep in sealant. Use vinegar carefully:
- dilute it with water
- do not leave it on sealant or natural stone for too long
- rinse thoroughly
- dry the sealant edge
Vinegar is especially suitable for light maintenance, not for heavily moldy sealant.
Baking soda against mold
Baking soda can help reduce dirt and odor, but it usually doesn't completely remove deep mold in caulk. Additionally, scrubbing with powder can damage the sealant. Avoid using baking soda if you have to scrub hard. Damaged sealant actually becomes rougher, causing dirt and mold to return more quickly.
Using chlorine: yes or no?
Chlorine can bleach mold stains, but use it carefully. It is aggressive, smells strongly and can corrode materials. Never use chlorine together with other cleaning products. Mixing it with acid, such as vinegar or descaler, can cause dangerous fumes.
Be careful with chlorine:
- black profiles
- natural stone
- colored kit
- metal parts
- poor ventilation
- small bathrooms
- coated surfaces
Rather, use a suitable mold cleaner according to the instructions. Do you want the rest of your glass to be streak-free? Then view our tips for cleaning glass without streaks.
When should your sealant be replaced?
Replacing the sealant is wise when cleaning no longer helps or the sealant is technically poor. Replace kit at:
- deep black spots
- mold that keeps coming back
- releasing sealant
- cracks
- soft sealant
- open seams
- leakage
- moisture behind the sealant
- sealant that is no longer elastic
- old sealant that continues to retain dirt
New sealant not only looks better, but also seals better.
Why does mold keep coming back?
If mold keeps coming back, the cause is usually unresolved. Only cleaning is temporary. Common causes:
- bathroom remains too humid
- ventilation is insufficient
- shower glass or tiles remain wet
- water remains in the corner
- sealant edge is porous
- old kit is damaged
- there is leakage behind the sealant
- cold bridge or condensation problem
- too little heating
So don't just tackle the stain, but also the moisture source.
Mold in specific areas
Kit is in very different places in the house. Different points of attention apply to each room.
Mold in shower kit
Shower kit has a hard time. The sealant is regularly submerged in water, gets soap residue and sometimes dries poorly. With shower sealant, mold is extra normal in:
- walk-in showers
- poor ventilation
- dark corners
- joints that remain wet
- shower walls with lime
- sealant edges under glass
- corners at floor and wall
If shower sealant remains black, replacement is usually the best solution.
Mold around glass and shower wall
With glass shower walls, sealant is often found between glass, profile, tile and floor. Mold can develop there due to stagnant water and soap residue. NB:
- sealant under the glass wall
- kit along U-profile
- kit for shower door
- sealant in corners
- sealant between glass and tile
- rubbers and sealing strips
Clean not only the glass, but also the sealant seams, profiles and rubbers. Otherwise mold will return quickly. Are you going to install a new wall? Then read what you should pay attention to with a custom shower enclosure.
Mold around window sealant
Mold around windows is often caused by condensation. If moisture settles on the window or frame, the sealant edge can remain wet for a long time. Causes:
- poor ventilation
- single glazing or old double glazing
- cold windows
- high humidity
- damp bedroom
- laundry drying inside
- poor gap sealing
- cold bridges
With window sealant it is therefore important to also look at condensation and ventilation. You can read more about this in our article about condensation on windows inside, outside and between glass.
Mold in kitchen kit
In kitchens, mold mainly develops around sinks, worktops and back walls. Water and food residues easily remain there. Look out for places like:
- kit along sink
- connection between worktop and wall
- kit for glass kitchen back wall
- kit at tap
- kit behind hob
- sealant for tiles
Clean kitchen kit regularly and dry wet areas. Damaged sealant must be replaced to prevent moisture behind the worktop. Are you considering a sleek, seam-free finish? Then take a look at the possibilities of a glass kitchen back wall.
How do you replace old kit?
If sealant needs to be replaced, the old sealant must be completely removed. New sealant adheres poorly to old sealant residue. The necessary tools such as a caulking gun, caulking remover and cutting knife can be found in our glass articles. Follow these steps:
- Cut off old sealant with a sharp knife.
- Carefully pull the sealant out of the joint.
- Remove sealant residue with a suitable sealant remover.
- Clean the surface.
- Degrease the surface.
- Let everything dry thoroughly.
- Apply new sealant.
The surface must be clean, free of grease and dry before sealing again.
Which sealant do you use against mold?
For damp areas you usually use sanitary kit. This is suitable for bathrooms and often contains anti-fungal properties. For example, use:
- sanitary silicone sealant for shower and bathroom
- suitable glazing sealant for glass and window frames
- special kit for natural stone if necessary
- anti-fungal sealant in wet areas
Please note: not every kit is suitable for every surface. With natural stone you must use special natural stone sealant to prevent stains. Don't know which type you need? In which kit do you use what? we list all types.
Mold resistant sealant: does it always stay clean?
No. Mold-resistant sealant helps, but does not completely prevent mold. If the room remains too humid or the sealant is always wet, mold-resistant sealant can also eventually discolour. Mold resistant sealant works best in combination with:
- good ventilation
- dry regularly
- keep it clean
- correct installation
- good water drainage
- sufficient heating
Sealant is not a solution for a structural moisture problem.
How do you prevent mold in sealant edges?
Prevention is easier than removal. Tips:
- ventilate after showering
- turn on window or ventilation
- dry shower glass and tiles
- dry sealant edges
- leave the bathroom door open after use
- clean weekly
- remove soap residue
- avoid stagnant water
- repair leaks immediately
- replace bad sealant on time
A dry sealant edge is much less likely to develop mold.
Ventilation is the most important factor
Mold likes moist air. That is why ventilation is crucial. Mechanical ventilation must work well, especially in bathrooms without windows. Check:
- does the fan work properly?
- is ventilation on long enough?
- is there supply air under the door?
- Does the mirror remain foggy for a long time?
- Does the bathroom feel damp for a long time?
- Does the sealant still remain wet after hours?
Does the bathroom stay damp for a long time? Then there is a good chance that mold will return.
Dry the shower after use
A simple habit helps enormously: dry glass, tiles and any sealant edges after showering. Advantages:
- less moisture
- less lime
- less soap residue
- less mold
- less cleaning work
- longer lifespan of sealant
It takes little time and prevents many problems.
Common mistakes with mold in sealant
- Clean the spot only — if ventilation or moisture problem remains, mold will return.
- Scrubbing too hard — you damage the sealant, which makes dirt adhere more quickly.
- Apply new sealant over old sealant — new sealant adheres poorly to old sealant residue.
- Using the wrong sealant — not every sealant is suitable for wet areas.
- Do not allow the surface to dry — sealant adheres poorly to a damp surface.
- Mixing chlorine with other substances — this can produce hazardous fumes.
- Continue to clean moldy caulk — you must replace deeply deteriorated caulk.
Selection aid: cleaning or replacing?
| Situation | Best choice |
|---|---|
| Light black dots on surface | Cleaning |
| Kit is still firm and smooth | Clean first |
| Stains come back quickly | Addressing the cause |
| Kit is deep black | Replace |
| Kit lets go | Replace |
| Kit is torn | Replace |
| There is leakage | Replace and resolve cause |
| Sealant is old and porous | Replace |
| Bathroom remains damp | Improve ventilation |
| New shower wall installed | Keep dry from the start |
Checklist for mold in sealant edges
Check these points:
- Is the mold on the kit or in the kit?
- Is the kit still sturdy?
- Release the sealant?
- Are there any cracks?
- Is there a leak?
- Does the room remain humid for a long time?
- Does the ventilation work well?
- Does water remain on the sealant edge?
- Is the shower pulled dry?
- Has the correct kit been used?
- Is the sealant old or porous?
- Does mold keep coming back?
Conclusion
Mold in sealant edges is mainly caused by moisture, soap residue and poor ventilation. You can sometimes remove light superficial mold with a suitable mold cleaner and a soft cloth or brush. Always rinse thoroughly and dry the sealant completely.
Is the mold deep in the sealant, does it keep coming back or is the sealant torn or loose? Then replacement is usually the best solution. Remove old sealant completely, clean and dry the surface, and use suitable plumbing sealant or glazing sealant. Also tackle the cause: ventilate well, dry the shower and prevent stagnant water. Only then will the new sealant remain clean and mold-free for longer.
Read more about limescale on shower glass, which kit you use for what and condensation on windows. Are you ready for a new glass shower wall or back wall? Create your custom-made shower enclosure, simply order custom-made glass or view our shower and bath solutions. Questions about the right finish? Please feel free to contact with us.